While this did produce something, it felt a little bit like an epic fail. Found a way to distill herbs into essential oil that sounded easy and like it might just work and to a degree it did.
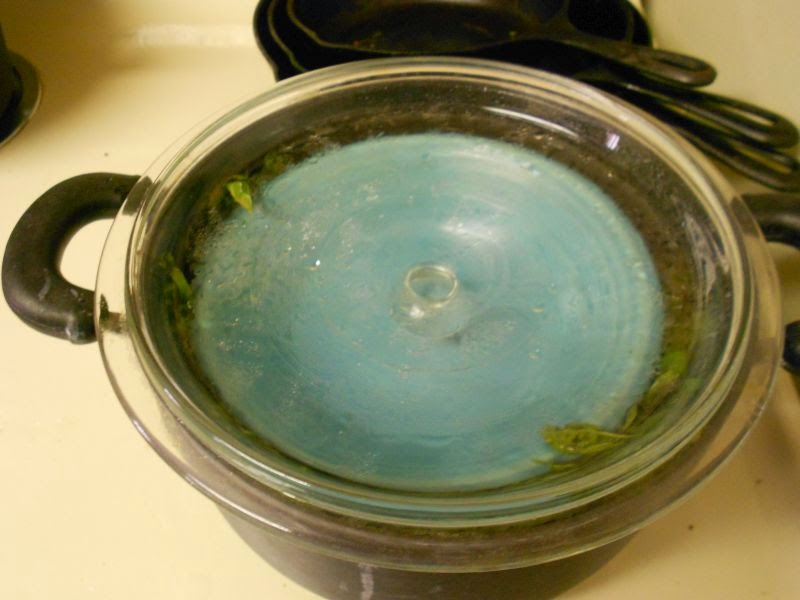
Started with a big old Dutch oven on the stove, a little bit of water in the bottom and lots and lots of basil as in the end of the season, grab it all picking laid and smashed into the pan. Next step, I put a ceramic bowl on top of the whole mess and put the lid on upside down. The upside down lid is important as the distilled liquid will collect on the lid and the concave shape of the lid will let the liquid drip into the bowl.
Here is a picture of what the whole setup looked like for me.
Once this is all setup, let the whole mess simmer down. The house smelled amazing while this process was going on and I did end up with about an ounce of liquid. The liquid can be stored in a small tight sealing jar and in a cool dark place.
This process can be used to distill most herbs. The key is that you need a lot of whatever you are distilling.
Have fun experimenting with this one!
Thursday, October 02, 2014
Where did the Summer Go?!?!?
Not sure where the summer went and here it it is already canning season!
Not make excuses but I did have a small computer catastrophe which was fixed post haste with a new computer. It has been a long time since I have had a new computer and I am not sure I like this new beast. I suppose I will get used to it and if truth be known, I am already sort of getting used to "it" and kind of starting to like it some.
Otherwise, most of the summer was spent hanging out in parks and making music I guess. It was so much fun! Then to end the summer, a quick trip up the North Shore of Minnesota was just what the doctor ordered.
In July Dusty Rockers (see one of my other blogs) hosted the first Potluck Music Jam 7 Mile Creek County Park. It was a blast, new friends were made and the food was wonderful. Everyone enjoyed themselves so much that we hosted an impromptu hot dog roast in August. Good times were had by all.
In September, the North Shore beckoned and we answered the call. Spent time rock hunting on the shores of Lake Superior, checked out Gooseberry Falls...
and saw Split Rock Lighthouse up close and personal for the first time ever. It was wonderfully refreshing and we have both resolved not to wait so long before we go again.
With that all said... on to canning and preserving the summer and fall harvest for the frigid winter here in the frozen north.
Not make excuses but I did have a small computer catastrophe which was fixed post haste with a new computer. It has been a long time since I have had a new computer and I am not sure I like this new beast. I suppose I will get used to it and if truth be known, I am already sort of getting used to "it" and kind of starting to like it some.
Otherwise, most of the summer was spent hanging out in parks and making music I guess. It was so much fun! Then to end the summer, a quick trip up the North Shore of Minnesota was just what the doctor ordered.
In July Dusty Rockers (see one of my other blogs) hosted the first Potluck Music Jam 7 Mile Creek County Park. It was a blast, new friends were made and the food was wonderful. Everyone enjoyed themselves so much that we hosted an impromptu hot dog roast in August. Good times were had by all.
In September, the North Shore beckoned and we answered the call. Spent time rock hunting on the shores of Lake Superior, checked out Gooseberry Falls...
and saw Split Rock Lighthouse up close and personal for the first time ever. It was wonderfully refreshing and we have both resolved not to wait so long before we go again.
Wednesday, June 11, 2014
Gourds!!!
So the fruits of last year's harvest continue to give as the garden is planted for the coming harvest. The gourds have been sitting since last fall through the winter and are ready to be cleaned up and used.
Here are a few that have been cleaned up. Some of them inside and out and a couple of them only on the outside while they wait for me to decide what they are going to become.
Two of these gourds have become purple martin houses, at least hopefully they will be pale enough to attract purple martins.
Only time will tell and yes, I realize they do not look like the traditional purple martin birdhouses. Call it an experiment if you will. At the very least if the purple martins don't like the houses, I am sure that some bird out there will... lol.
Here are a few that have been cleaned up. Some of them inside and out and a couple of them only on the outside while they wait for me to decide what they are going to become.
Two of these gourds have become purple martin houses, at least hopefully they will be pale enough to attract purple martins.
Only time will tell and yes, I realize they do not look like the traditional purple martin birdhouses. Call it an experiment if you will. At the very least if the purple martins don't like the houses, I am sure that some bird out there will... lol.
Tuesday, June 03, 2014
Ways to Use Homemade Yogurt
Loving this home made yogurt (recipe in previous post)!
Tonight I am trying a first. Since I am out of the plain yogurt I bought to make the first few batches of homemade yogurt, I will be making a new batch of yogurt from itself. I cannot imagine why this should not work and I am hoping that it will. I am becoming used to have the homemade yogurt as a staple in my refrigerator.
So far my favorite ways to eat it as a snack are:
Tonight I am making baked fish with a sour cream/home made sauce on top. All the sauce is made of is home made yogurt, Parmesan cheese, butter, salt and pepper. Can't wait to let you all know how it was. Waiting to post the recipe until it passes my taste test as I grabbed the recipe off the "net" and lately it seems that there have been several recipes I have tried that were not so good. Not terrible but not something I would ever make again without tweaking the recipe.
Tonight I am trying a first. Since I am out of the plain yogurt I bought to make the first few batches of homemade yogurt, I will be making a new batch of yogurt from itself. I cannot imagine why this should not work and I am hoping that it will. I am becoming used to have the homemade yogurt as a staple in my refrigerator.
So far my favorite ways to eat it as a snack are:
- Cut fresh strawberries, sprinkle a little sugar or honey on them (I use Sun Crystals, a stevia based sweetener), spoon some home made yogurt over the top with a little vanilla, mix and eat
- Use any kind of summer berry or fruit as above.
- Mix a bit of orange extract and honey into home made yogurt.
- Mix a little chocolate syrup into a bowl of the home made yogurt.
Tonight I am making baked fish with a sour cream/home made sauce on top. All the sauce is made of is home made yogurt, Parmesan cheese, butter, salt and pepper. Can't wait to let you all know how it was. Waiting to post the recipe until it passes my taste test as I grabbed the recipe off the "net" and lately it seems that there have been several recipes I have tried that were not so good. Not terrible but not something I would ever make again without tweaking the recipe.
Tuesday, May 20, 2014
Homemade Yogurt
Finally got around to trying to make homemade yogurt. It was amazingly easy and I do believe that making your own is quite cost-effective.
Here is the recipe that I found worked the best for me.
HOME MADE YOGURT
4 cups of water-divided
1 3/4 cup dry milk powder
1 1/2 Tablespoon of plain yogurt with active cultures
Mix the yogurt into two cups of water and mix the dry milk mix into the other two cups of water. All you do now is put both mixtures together into a quart sized glass jar and put it in a warm spot for 12-15 hours. Once you have yogurt, chill it in the refrigerator.
When I make this, I actually start with lukewarm water from the tap and set mine on top of the refrigerator because it tends to be warm up there. If I have something cooking in the crock-pot, I set the jar between the crock-pot and the wall, another warm place. The original recipe suggested a heating pad, It did not say what setting to use but this might be something to experiment around with.
You can get yogurt with active/live cultures at just about any grocery store, Dannon and Old Home are two brands that come to mind who use active cultures. I would make sure that the yogurt is plain just because your homemade yogurt will be more versatile once it is done. Once you have made a batch, you will be able to use the yogurt you have made to make your next batch.
Here is the recipe for one of the things I have made with my homemade yogurt, so simple and so yummy.
CREAMY CUCUMBER SALAD
2-3 cucumbers-peeled and sliced thin
1 small sweet onion-sliced thin
sea salt (regular salt will work too)
1 cup homemade yogurt
1 Tablespoon lemon juice
Pepper to taste
Mix cucumbers and onions in a bowl and sprinkle with sea salt, enough so that they start to juice a little bit. Let them sit and juice for about an hour. If they make a lot of juice, drain them so your salad isn't too runny. In another bowl mix together yogurt, lemon juice and pepper. When cucumbers are ready, pour your yogurt mixture on top and mix gently. This is where you can add salt to taste if you like. There should be enough salt already on the cucumber and onions but if there isn't feel free to add some.
There is a lot of experimenting I want to do with my homemade yogurt but I am actually thinking I can substitute it for sour cream in most recipes. I have found that the one thing to keep in mind is that when you buy yogurt or sour cream from the store, there is salt in it if for no other reason than that they add salt to add weight. When you are cooking with your homemade yogurt, keep in mind that your homemade yogurt doesn't have salt added. Otherwise, take your homemade yogurt and have a blast trying it in new and old recipes.
Here is the recipe that I found worked the best for me.
HOME MADE YOGURT
4 cups of water-divided
1 3/4 cup dry milk powder
1 1/2 Tablespoon of plain yogurt with active cultures
Mix the yogurt into two cups of water and mix the dry milk mix into the other two cups of water. All you do now is put both mixtures together into a quart sized glass jar and put it in a warm spot for 12-15 hours. Once you have yogurt, chill it in the refrigerator.
When I make this, I actually start with lukewarm water from the tap and set mine on top of the refrigerator because it tends to be warm up there. If I have something cooking in the crock-pot, I set the jar between the crock-pot and the wall, another warm place. The original recipe suggested a heating pad, It did not say what setting to use but this might be something to experiment around with.
You can get yogurt with active/live cultures at just about any grocery store, Dannon and Old Home are two brands that come to mind who use active cultures. I would make sure that the yogurt is plain just because your homemade yogurt will be more versatile once it is done. Once you have made a batch, you will be able to use the yogurt you have made to make your next batch.
Here is the recipe for one of the things I have made with my homemade yogurt, so simple and so yummy.
CREAMY CUCUMBER SALAD
2-3 cucumbers-peeled and sliced thin
1 small sweet onion-sliced thin
sea salt (regular salt will work too)
1 cup homemade yogurt
1 Tablespoon lemon juice
Pepper to taste
Mix cucumbers and onions in a bowl and sprinkle with sea salt, enough so that they start to juice a little bit. Let them sit and juice for about an hour. If they make a lot of juice, drain them so your salad isn't too runny. In another bowl mix together yogurt, lemon juice and pepper. When cucumbers are ready, pour your yogurt mixture on top and mix gently. This is where you can add salt to taste if you like. There should be enough salt already on the cucumber and onions but if there isn't feel free to add some.
There is a lot of experimenting I want to do with my homemade yogurt but I am actually thinking I can substitute it for sour cream in most recipes. I have found that the one thing to keep in mind is that when you buy yogurt or sour cream from the store, there is salt in it if for no other reason than that they add salt to add weight. When you are cooking with your homemade yogurt, keep in mind that your homemade yogurt doesn't have salt added. Otherwise, take your homemade yogurt and have a blast trying it in new and old recipes.
Friday, May 02, 2014
Garden Sprouts
Got some sprouts popping up here. Green tomatoes and paste tomatoes are popping like crazy. The 6 holes in the middle are peppers and I expect them to pop any day now. Definitely need to do some thinning out and will be taking care of business there beginning of next week. Maybe by then there will be some pepper sprouts too!
Thursday, February 20, 2014
Skillet Un-Corn Bread
Okay... this one is as super simple or as difficult as you care to make it. All you really need to do is take your favorite cornbread recipe and give it a new twist by substituting some uncooked multi-grain hot cereal for the corn meal, measure for measure. I like to use Bob's Red Mill 10 Grain Hot Cereal (uncooked) with the recipe that you find on packages of Quaker Yellow Corn Meal. Here is that recipe in case you don't used corn meal or don't happen to have any on hand.
Easy Corn Bread
1 1/4 cup all purpose flour
3/4 cup corn meal
1/4 cup sugar
2 teaspoons baking powder
1/2 teaspoon salt
1 cup milk
1/4 cup vegetable oil
1 egg, beaten
Combine dry ingredients and wet ingredients separately before stirring them together just until dry ingredients are moist. Turn into a 8" or 9" pan or skillet.
Bake at 400ยบ until golden and toothpick comes out clean. Serve warm. I like to serve it warm with honey and butter, the real stuff. Makes about 8 servings.
Easy Corn Bread
1 1/4 cup all purpose flour
3/4 cup corn meal
1/4 cup sugar
2 teaspoons baking powder
1/2 teaspoon salt
1 cup milk
1/4 cup vegetable oil
1 egg, beaten
Combine dry ingredients and wet ingredients separately before stirring them together just until dry ingredients are moist. Turn into a 8" or 9" pan or skillet.
Bake at 400ยบ until golden and toothpick comes out clean. Serve warm. I like to serve it warm with honey and butter, the real stuff. Makes about 8 servings.
Thursday, January 23, 2014
Shiny Chrome
Just had to share this little cleaning tidbit I saw on
television the other night, American Restoration to be exact.
Do you have chrome sink fixtures that have built up “yuck”?
Hard water marks, years of soap scum build up or a combination of both? Because
we rent our homes, many times we walk into a place that has been taken care
with less care than what we would use. Not saying we are neat freaks and we do
tend to have a lot of clutter that is interesting to us around our home.
Clutter aside, we do try to keep a clean home, which is not always what we walk
into when we move.
The other night American Restoration shared this cool
tip for cleaning chrome. All you need is a piece of aluminum foil and a little
water. Of course we had to try this.
We crumpled up some aluminum foil into a sort of cleaning
ball and started working on the kitchen faucet. Amazing! After almost 2 years
of scrubbing and cleaning with various household cleaners and varying degrees
of success, we now have chrome bath and kitchen fixtures that are shiny bright
and look like new.
Thank you Rick Dale, owner of Rick’s Restoration, Las Vegas,
Nevada.
Saturday, January 18, 2014
Peppery Creamed Chicken & Cheese Biscuits
This morning I was hungry for sausage gravy and biscuits.
After rooting around in the kitchen I found no sausage… BUT I did find chicken.
Okay, I will make chicken gravy and biscuits, probably healthier anyway. As
always my disclaimer is this: Feel free to substitute to make it your own.
Peppery Chicken Gravy
2 frozen chicken breasts or 4 chicken tenderloins
8 oz carton of fresh mushrooms
1 bunch green onion tops
2 cloves garlic
2 jalapeno peppers (chopped)
1 banana pepper (chopped)
½ cup flour
3 cups milk
Spices or chicken bouillon (I used Tony Chachere’s Cajun
Seasoning)
Salt and pepper
In a Dutch oven, place chicken, enough to water to cover
chicken by 2 inches (about 6-8 cups). Add spices or chicken bouillon and
peppers. Cook/simmer down to half, remove the chicken and chop it and then add
everything else except the flour, milk, salt and pepper.
Once all ingredients are cooked and pot is simmering at a
slow boil, mix flour, milk, salt and pepper until this is smooth. Mix slowly
into the chicken broth and continue to stir until it thickens.
The biscuits do not have to be cheese biscuits.You can use ready to bake biscuits from the refrigerated section of the grocery store, you can use dry biscuit mix from the baking aisle of the grocery store or you can make your own cheese biscuits which is truly not as hard as it sounds.
Cheese Drop Biscuits
2 cups flour
3 teaspoons baking powder
½ teaspoon salt
½ cup shortening
1 cup grated cheese (your choice, I like sharp chedder)
¾ - ½ cup milk
Preheat oven to 450ยบ
Mix dry ingredients together and cut shortening into the dry
with a pastry blender or fork until it is a crumbly texture. Mix the shredded
cheese into the crumble mix and then stir in milk. Be careful not to over mix,
just until the dry ingredients are wet.
Drop by spoonfuls onto a greased cookie sheet and bake for
10-12 minutes or until the tops are golden.
There you have it, a favorite brunch recipe of mine for the weekend.
Friday, January 17, 2014
Where Canning Begins
So this is where it all begins for next summer and fall. It is really quite simple. You order the seeds, you plant the seeds, you take care of them and watch them grow.
If you want to get away from ordering seeds, you start with a few heirloom seeds and save seed year to year when you find a variety of something that you really like. This is how I remember my grandparents doing it. I remember seeing "wet" seeds spread on newspaper and "dry" seeds in glass baby food jars all lined up on the ledges of the basement windows for the winter.
This year I begin a local collection with the help of some friends who live outside of a small town called Cleveland, Minnesota and family outside of Gibbon, Minnesota. Are you getting the drift that I live in town in a bright and sunny apartment but an apartment nonetheless? This year I ordered 3 types of seed from Seed Savers Exchange <http://read.timesprintingdigital.com/t/26979/8> to start the collection.
Because I love fried green tomatoes, that one was a no brainer when I saw Aunt Ruby's German Green Tomatoes. Then I noticed Amish Paste Tomatoes, yup, I can almost taste the sauce! But here is the seed that brought me to the seed catalog in the first place. Kalman's Hungarian Tomato Pepper! They look unbelievable interesting. Yes folks, other than the fact that I like peppers, I ordered them and want to grow them because they look so cool!
The Tarahumara White Seeded Sunflowers were an added bonus and one of the reasons I love ordering seeds. The seed companies almost always send along complimentary seeds and you never know what you will get, kind of like Forrest Gump's chocolates.
It is going to be an exercise in patience to keep these seeds till it is time to plant them. The way the weather is looking, I am thinking somewhere between the middle of March to the middle of April. I almost always do stuff like this on "gut instinct" and I think this will be no exception.
If you want to get away from ordering seeds, you start with a few heirloom seeds and save seed year to year when you find a variety of something that you really like. This is how I remember my grandparents doing it. I remember seeing "wet" seeds spread on newspaper and "dry" seeds in glass baby food jars all lined up on the ledges of the basement windows for the winter.
This year I begin a local collection with the help of some friends who live outside of a small town called Cleveland, Minnesota and family outside of Gibbon, Minnesota. Are you getting the drift that I live in town in a bright and sunny apartment but an apartment nonetheless? This year I ordered 3 types of seed from Seed Savers Exchange <http://read.timesprintingdigital.com/t/26979/8> to start the collection.
Because I love fried green tomatoes, that one was a no brainer when I saw Aunt Ruby's German Green Tomatoes. Then I noticed Amish Paste Tomatoes, yup, I can almost taste the sauce! But here is the seed that brought me to the seed catalog in the first place. Kalman's Hungarian Tomato Pepper! They look unbelievable interesting. Yes folks, other than the fact that I like peppers, I ordered them and want to grow them because they look so cool!
The Tarahumara White Seeded Sunflowers were an added bonus and one of the reasons I love ordering seeds. The seed companies almost always send along complimentary seeds and you never know what you will get, kind of like Forrest Gump's chocolates.
It is going to be an exercise in patience to keep these seeds till it is time to plant them. The way the weather is looking, I am thinking somewhere between the middle of March to the middle of April. I almost always do stuff like this on "gut instinct" and I think this will be no exception.
Sunday, January 05, 2014
Heirloom and Hybrid Seeds
Heirloom vs. Hybrid Seeds
To begin defining heirloom
seeds and plants, all you have to do is look at the definition of heirloom in
general. Heirlooms are items that have been passed down, unchanged, through the
generations. Heirloom seeds and plants fit into this same definition and are
seeds and plants that have been cultivated openly and without change for
decades. They remain consistent year after year. Seeds and cuttings from
heirloom plants can be planted and propagated with identical results time after
time.
That said heirlooms are not
hybrids and vice versa. Hybrids are seed and plant varieties that are created
through the combining of several other varieties of plants through
cross-pollination or grafting. These are seeds and plants that do not have
their genetic base altered. Most times a hybrid is a sterile, can be grown from hybrid seed once and will not
reproduce. If a hybrid does reproduce in following years, it will grow as one
of the original varieties used to create it.
To sum it all up, heirloom
seeds and plants are truly non-GMO. Hybrid seeds and plants cannot be heirloom
but can be either GMO or non-GMO.
Reference
<http://www.heirloomseeds.com/history.htm>
<http://www.goodgirlgonegreen.com/gardening/what-is-the-difference-between-organic-heirloom-hybrid-and-gmo>
What are GMO Seeds?
What are GMO Seeds?
Let’s start with GMO. What exactly is GMO and what does GMO
stand for? It is the acronym for Genetically Modified Organism. Okay, so what
does this exactly mean? Genetics are genes, DNA, the base cells that are the
blueprint for what every living thing is and will become. Organisms are all
things living, from the microscopic to the huge. Plants, animals, viruses, if
it moves and/or grows it is an organism. Anything that is a living organism or
that was a living organism has DNA.
Science has come so far that it has figured out how to
alter the seeds that grow our food on this genetic level. This should not be
confused with the art of cross breeding as this is a whole new ballgame. At
first this seemed like a good idea. Science was capable of altering soy seed
and corn seed to make them more disease resistant and give them higher yields.
In a world where third world countries still exist with starving populations,
this was huge. No one gave much thought to the long-term affects that are just
now starting to be known.
These crops grown from GMO seeds are cross-pollinated with
the noxious weeds that have been a bane to farmers for centuries. Because the
GMO seeds have been made to be resistant to the herbicides that kill these
weeds, the weeds have become resistant as well. More and more herbicide is
needed to control the weeds and more herbicide use creates more opportunity for
ground water contamination.
Then there are the “organisms” that carry the genetically
altered pollen, like bees and butterflies. The following excerpt talks about a
study on Monarch butterflies.
The results of a 1999 study conducted by researchers at Cornell University suggest that genetically engineered crops also endanger wildlife, specifically the Monarch butterfly. These researchers found that nearly half of the Monarch caterpillars that ate milkweed leaves dusted with pollen from genetically engineered corn died within four days. A study conducted one year later at Iowa State University found that plants that neighbor farms of genetically engineered corn are dusted with enough corn pollen to kill Monarch caterpillars.
http://www.whfoods.com/genpage.php?tname=george&dbid=207
Are you starting to get the picture yet? While GMO seeds
were initially looked at as a “god-send”, they may not have been looked at
close enough before they began to be used on a large-scale basis and that my
friends is GMO seeds in a nut-shell.
Now that you know what GMO seeds are, logic tells you that non-GMO seeds are seeds that have not been genetically modified. Be aware that this does not necessarily make them or not make them heirloom or hybrid. It just means they have not been been genetically altered at their base cell level.
Reference:
The World’s Healthiest Foods
<http://www.whfoods.com/>
Seeds, seeds and more seeds!
So
it is that time of year again. The cold winter wind is blowing, we are all
huddled up in our homes dreaming of spring and the seed catalogs are coming in
the mail feeding these dreams. But wait… Heirloom? Hybrids? GMO? Non-GMO? What
are these types of seeds really? They are the good, the bad and the ugly. In
order to make for easier reading, these will be broken
up into more than one post.
Friday, November 08, 2013
Alpine Strawberries
Have you ever noticed that tiny blessings appear just when
you seem to need it the most? I was blessed with one yesterday, just when I
needed it the most.
This fall I was given a potted Alpine Strawberry (Fragaria
Alipina). These are wild strawberries that grow a bit larger than their cousin
the Woodland Strawberry (Fragaria Vesca), also a wild strawberry. I was told
when it was given to me that it had never born fruit even though it had been
grown outside all through the summer months. I did some research and found it
is an ever-bearing strawberry and winters well indoors. Unfortunately, one
article I read talked about how they need to be hand pollinated if they are
kept indoors all year. Okay, I thought, not sure if I would ever get blossoms
or berries but it is a pretty little plant nonetheless.
![]() |
| Alpine Strawberry (Fragaria Alpina) |
Well, the pictures show what has happened with this lovely
little plant over the past several weeks. It has not only blossom but a brand
new baby berry as well, which I happened to notice yesterday when I most needed
a tiny little miracle. There were only 2 blossoms that I could find, although I
am sure there may well be more hiding in there somewhere. Today there is one
blossom and one berry and I can’t wait to see if it actually does become a
lovely little red strawberry.
Sunday, October 27, 2013
Apples in the Pot to Apple Butter in the Jar-O
So last week was apple day at the Nest and I finally decided
on making apple butter. I make my apple butter in the crockpot for several
reasons. It never burns and it is such sweet torture to smell it cooking all
day.
The first step is the apples. If you happen to have an apple
tree in your backyard, wonderful. The only problem will be in figuring out how
many pounds you have picked. Here is a chart and the link to help with that
small problem.
1 pound of
apples equals:
2 large apples OR
3 medium apples OR
2 3/4 cups of cored &
sliced/chopped apples OR
1 1/3 cup of applesauce
http://homecooking.about.com/od/foodequivalents/a/appleequiv.htm
If you do not have access to an apple tree, a good solution
might be a local orchard. The apples are fresh picked, there are usually many
varieties to pick and choose from and the apples are measured out by the pound
for you.
Once the apples have been picked/bought, they need to be
peeled, cored and chopped and thrown in the pot. Just add the sugar and spice
and turn the crockpot on low.
Crockpot Apple Butter
3# apples
2 cups sugar
12 teaspoon cinnamon
1 pinch cloves or nutmeg
Simmer in the crockpot for 8-10 hours.
As soon as the apples are soft enough, I give them a spin in
the blender and return them to the crockpot because I like a nice smooth apple
butter. If you happen to like your apple butter a little more on the chunky
side, you can use a potato masher while they are in the crockpot and mash them
to the consistency you like. The apple butter should be cooked down to about
half of what you started with. A wooden spoon should stand by itself in the
middle of the whole hot yummy mess.
When the apple butter is done, put it into hot sterile jars
and process in a canning bath for 25 minutes.
Wednesday, October 23, 2013
Four-legged Furry Staff
Just for the fun of it I thought I would share a picture of
my furry ‘staff’ helping out with the writing of posts for this blog.
Meet Mona, she likes to keep the keyboard warm and tries to
keep one paw on the touchpad with me. She enjoys watching the screen and
started by watching bird videos. She has now graduated to watching just about
anything happening on the screen.
Tuesday, October 22, 2013
Potato Soup
Here is a recipe that I have been making for years that I am
not even sure where I ever learned to make it. I just know it is yummy good and
can be tinkered with depending on what you have on hand.
Potato Soup
Ingredients:
6 potatoes diced
1 cup chopped onion
2 carrots thin sliced
2 ribs of celery thin sliced
4 cups chicken broth
¼ cup of flour
1 ½ cup of milk
Toss the potatoes, onion, carrots, celery and chicken broth
in the crockpot on high. Cook until done, 2-3 hours should be good. Mix the
milk and flour together like you would for milk gravy and add to the soup. Let
it boil until thick and then turn on low to keep warm and serve.
Once again, no picture because I was not thinking of even
posting this one but it is such a comfort food for a chilly fall day.
Creamed Cabbage (Baked)
So, I love creamed cabbage but I also love easy in the
kitchen and this recipe seemed to have it all. Sorry there are no pictures for
this one, we were really hungry and I guess I had never really intended to put
this one on my blog at the time.
Since then I have decided that just because a recipe might
seem strange or unusual, does not mean that there are not those out there who
might like it and maybe did not even think to look for it. With that said, here
it is.
Creamed Cabbage (Baked)
Ingredients:
1 cup milk
2 Tablespoons butter
1 dash black pepper
¼ teaspoon salt
2 Tablespoons butter
1 dash black pepper
¼ teaspoon salt
2 Tablespoons flour
1 cup of Romano cheese
1 medium head of cabbage
Shred the cabbage and steam it until it is tender. To do
this, I used a pasta kettle. Fill the bottom with a few inches of water, not
enough to reach the top part. Bring the water to a boil and put the cabbage in
the top for about 5 minutes or until it is tender. The time will vary depending
on how thin or thick you shredded the cabbage.
In a heavy kettle over medium heat, melt the butter and then
mix in the flour, salt and pepper and stir it into a soft dough ball. Add the
milk and whisk the milk and the dough ball together and bring back to a boil to
thicken the sauce. When sauce is thick and hot, whisk in the Romano cheese.
(The original recipe calls for the cheese to be added to the cabbage separately
and not added to the sauce.)
Put the cabbage in a baking dish, pour the sauce over the
top and bake at 350° for about 30 minutes or until the sauce is hot and bubbly.
(The original recipe calls for the cabbage, sauce and cheese to be put into the
baking dish in layers.)
www.allrecipes.com/recipe/creamed-cabbage/
Apple Cider Pork Roast
Here in Southern Minnesota fall is apple season. This year
we had the time and wherewithal to visit our local apple orchard, Welsh
Heritage Farms Apple Orchard and Pie Shop and Harbo Cider. I love, love, love
these places. It always smells to good and you get to taste test some of the
wares, yummy.
Of course I bought apples and some local honey before moving
on to the cider store. Not only do they sell fresh apple cider but they also
sell hard cider and specialty cheese here.
It was the fresh apple cider and the pork roast in the freezer that had
me hooked on this recipe. Not only did it sound like something different and
tasty, it seemed to be just what the doctor ordered for this time of year.
Crockpot Apple Cider Pork Roast
Boneless pork shoulder or sirloin roast (3 ½ - 4 lbs)
2 medium onions sliced
4-6 carrots cut into 1 inch slices
2 cloves of garlic minced
½ teaspoon of salt
1/8 teaspoon of pepper
½ teaspoon of allspice (I used whole)
1 teaspoon of chili powder
1 teaspoon of dried
leaf marjoram or thyme
2 cups of natural apple juice or cider ( I used 1 ½ cups of
apple cider and ½ cup of apple cherry juice)
2 Tablespoons of cider vinegar
Layer the onions on the bottom of the crock pot and put the
roast on top of them. If there is netting on the roast leave it on.
Next put the carrots in the pot around the roast and put
your spices on the top of the roast.
Pour the apple cider/juice over the top, cover and cook on
high for 1 hour.
Finally you can either turn pot to low for 6-8 hours or
leave it on high for another 3-4 hours.
When the roast is done, the juices can be transferred to a
kettle and used for gravy if you like.
Accompany this dish with some sort of starch like mashed
potatoes or buttered noodles and enjoy.
www.southernfood.about.com/od/crockpotporkandham/r/r81002c.htm
Here's what mine ended up looking like... yummy!
![]() |
| Disclaimer: This is not the entire roast... we were hungry! |
Sunday, October 20, 2013
Grandma's Tomato Jam
This is a jam I looked forward to
every summer. I remember having it at my grandmother’s house when visiting and when I had my own home and my own garden I also made this yummy jam. Once
again, it has been many years since I have made this jam and it still turned
out just as yummy as I remember it.
6 cups of fresh tomato sauce (about a dozen medium to large
tomatoes)
6 cups of sugar
1 tablespoon of lemon juice
Prepare the jars you plan to put jam in and the you will need
to peel the tomatoes. The easiest way I have found to peel tomatoes is to set
them in boiling water for a minute or two and then take them out, letting them
cool enough to handle and slip the skins right off. Cut out the stem and any
undesirable spots and throw the tomatoes right into the Dutch oven (remember
the Dutch oven?).
Here’s what I think of as the fun part. By this time the
tomatoes should be cool enough to squish them up with your hands. Keep
squishing until the tomatoes look like chunky tomato juice. Next I add the
lemon juice and bring the tomatoes to a boil before adding the sugar After adding
the sugar, I boil the whole hot mess until the sugar is melted into the
tomatoes. Simmer what is now jam over medium heat for 1-2 hours or until it is
thick enough to coat a spoon.
When the jam is done, pour it into your waiting jars and
process them in a canning bath for 25 minutes.
![]() |
| Tomato Jam on the left. |
Subscribe to:
Posts (Atom)


